 by
by 
In the last article, we created User RESTful APIs using Express.js. But for the persistence, we didn’t code anything. We just mocked the data since we had no database connection. This time we complete that example by connecting to MySQL. The focus of this article is to use MySQL in Node.js.
MySQL driver for Node.js
When it comes to connecting to a database in any platform there are two options:
- ORM
- Write your own code
Personally for any project as long as the queries are not too crazy and the performance does not need to be blazing fast, I go with ORMs since they provide much-added benefit.
In this example, however, I decided that we are better off using just a low-level library and write our own code. This is much easier in Node.js compare with Java since the data structure by default is JSON and much of crazy back and forth mapping can be eliminated using object destructuring/constructing.
At the time of writing this article, there are two dominant MySQL drivers available for Node.js, <a href="https://www.npmjs.com/package/mysql">mysql</a> and <a href="https://www.npmjs.com/package/mysql2">mysql2</a> respectively. mysql is the older driver which is very popular but lacks promises and some other goodies. But mysql2 has all of them and also compatible with mysql driver. Hence, we use that for this example.
So let’s get started.
Database design
Before jumping to writing the code, first, we need to design the database structure. Let’s assume that we have a database called user in which has a table users with the following structure,
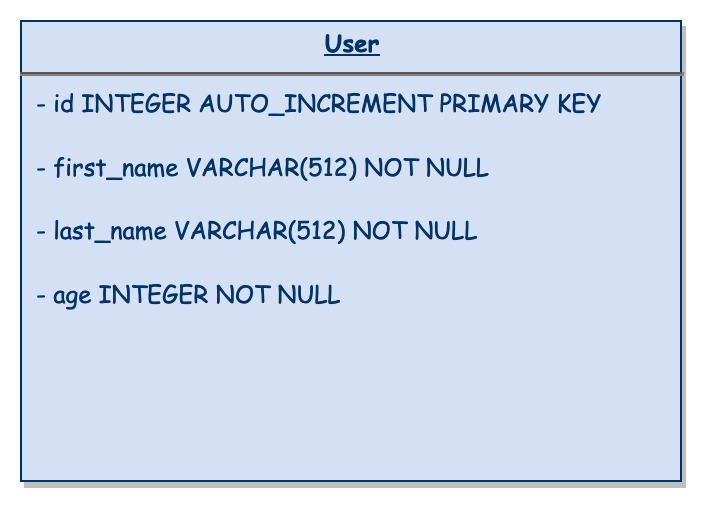
CREATE TABLE IF NOT EXISTS users (
  id INTEGER AUTO_INCREMENT PRIMARY KEY,
  first_name VARCHAR(512) NOT NULL,
  last_name VARCHAR(512) NOT NULL,
  age INTEGER NOT NULL
) engine=InnoDB;


INSERT IGNORE INTO users VALUES(1, "John", "Wick", 45);
Create a docker-compose file
It is a very good practice to use dockerize everything so the project setup will be smooth. This is equally important for the dev environment. Otherwise, developers have to spend much time to set up their local machines.

Luckily here we an extra simple app so we don’t have many complications. All we need to do is to create a MySQL docker-compose.yml file as follows,
version: "3.7"

services:
  db:
    hostname: mysql-user
    container_name: mysql-user
    image: mysql:8.0.19
    ports:
      - "3306:3306"
    environment:
      - MYSQL_ROOT_PASSWORD=secret
      - MYSQL_DATABASE=user
Adding the dependency
Let’s add mysql2 driver to the project. For that, we run this command,
$ npm install --save mysql2Externalzing the configuration
Never hardcode anything in any project, regardless of who can see your code. When coding all the time assume that you are working in an open-source project that your code is publicly available. Would you like to leave credentials there? Surely NOT!
The easiest way I found in Node.js is to use environment variables to pass any credentials. But I’d like to have it in a separate file called config.js. It only reads the values from env variables or set defaults if none available.
What we need is database URL, database name, database username and database password. I also decided to externalize the webserver port for the sake of flexibility. Our configuration then will look like this,
let config = {};

config.database = {};

config.web = {};

config.database.host = process.env.DATABASE_HOST || "localhost";
config.database.user = process.env.DATABASE_USER || "root";
config.database.password = process.env.DATABASE_PASSWORD || "secret";
config.database.name = "user";
config.web.port = process.env.WEB_PORT || 8090;

module.exports = config;
As you can see there are two sets of configurations web and database. And there is a default value for each field if the corresponding environment variable is not set.
Connecting to the database
Like what we did for the configuration, we also need to have a dedicated module for the database layer. Let’s call it store.js. This is the place where all the interaction with the database happens.
The first thing to do is to import the mysql2 library and create a connection pool as follows,
import config from "./config";
import mysql from "mysql2/promise";

const pool = mysql.createPool({
  host: config.database.host,
  user: config.database.user,
  password: config.database.password,
  database: config.database.name,
  waitForConnections: true,
  connectionLimit: 10,
  queueLimit: 0
});
Then right away we can start coding any necessary functions we need. If you recall from the previous tutorial we have CRUD APIs. That means we need the following functions:
getAllUsersgetUserByIdcreateUserdeleteUserByIdupdateUser
In the following subsections, we go through the implementation of each function separately.
Implementation of getAllUsers
This the simplest function to implement. All we have to is to query the database and return the result,
async function getAllUsers() {
  const result = await pool.query(
    "SELECT id, first_name AS firstName, last_name AS lastName, age FROM users"
  );
  return result[0].length < 1 ? {} : result[0];
}
We compare the result set and if it’s empty we return empty array accordingly. Otherwise, we return the results.
Implementation of getUserById
All that’s required for this function implementation is the userId. But forming the query is tricker than the last part because part of it is dynamic. Additionally, if the user not found, an appropriate exception should be thrown.
async function getUserById(id) {
  const result = await pool.query(
    "SELECT id, first_name AS firstName, last_name AS lastName, age FROM users WHERE id = ?",
    [id]
  );
  if (result[0].length < 1) {
    throw new Error(`User with id = ${id} not found`);
  }
  return result[0][0];
}
As you can see first we created a prepared statement and then pass the id. The return part is weird though. First it check the length of the result set result[0].length and if it’s greater than 0 gets its first element result[0][0].
Implementation of createUser
We need to get three parameters firstName, lastName, and age. If for whatever reason fails to persist, we need to throw the error. Otherwise, the persisted user should be returned. For this part, we need to leverage getUserById function,
async function createUser(firstName, lastName, age) {
  const result = await pool.query(
    "INSERT INTO users SET first_name = ?, last_name = ?, age = ?",
    [firstName, lastName, age]
  );
  if (result[0].length < 1) {
    throw new Error(
      `Failed to create a new user ${firstName}, ${lastName}, ${age}`
    );
  }
  return getUserById(result[0].insertId);
}
To get the id of the persisted entity, we use result[0].insertId. Isn’t cool?
Implementation of deleteUserById
This implementation is also simple. It is just a basic delete statement,
async function deleteUserById(id) {
  const result = await pool.query("DELETE FROM users WHERE id = ?", [id]);
  if (result[0].affectedRows < 1) {
    throw new Error(`User with id ${id} does not exist`);
  }
  return "";
}
Implementation of updateUser
Update user is similar to createUser. We need to return the updated entity if the update process is successful. Hence, we need to user getUserById function here as well.
async function updateUser(id, user) {
  const result = await pool.query(
    "UPDATE users SET first_name = ?, last_name = ?, age = ? WHERE id = ?",
    [user.firstName, user.lastName, user.age, id]
  );
  if (result[0].affectedRows < 1) {
    throw new Error(`User with id ${id} does not exist`);
  }
  return getUserById(id);
}
To check whether the update process was successful, we check result[0].affectedRows < 1. If it is 0 means nothing has changed. This implies the given userId was wrong, so we throw an exception.
Glue everything together
So the database layer implementation is done. Now we just need to use it in the app and replace the mock data. This section covers that.
First, let’s import the config.js and store.js modules,
import config from "./config";
import store from "./store";

const PORT = config.web.port;
const app = express();
Now we can start replacing the mock data with the real database connection. Since store.js returns a promise we need to use two callbacks then and catch. Then triggers when the function executed successfully and catch triggers when there’s an exception. So we can implement it like this,
import express from "express";
import bodyParser from "body-parser";
import { restart } from "nodemon";
import config from "./config";
import store from "./store";

const PORT = config.web.port;
const app = express();

app.use(bodyParser.urlencoded());
app.use(bodyParser.json());
app.use(
  bodyParser.urlencoded({
    extended: true
  })
);

app.use("/api/v1/users/:id", function(req, res, next) {
  if (req.params.hasOwnProperty("id") && !isNaN(parseInt(req.params.id))) {
    next();
  } else {
    console.log("Request is invalid!");
    res.status(400).send({ error: "User id should be a number" });
  }
});

// Error handling for uncaught exceptions
app.use(function(err, req, res, next) {
  console.error(err.stack);
  res.status(500).send({ error: "Internal server error" });
});

app
  .route("/api/v1/users/:id")
  .get(function(req, res) {
    store
      .getUserById(req.params.id)
      .then(user => res.status(200).send(user))
      .catch(error => res.status(404).send({ error: error.message }));
  })
  .delete(function(req, res) {
    store
      .deleteUserById(req.params.id)
      .then(result => res.status(204).send())
      .catch(error => res.status(400).send({ error: error.message }));
  })
  .put(function(req, res) {
    let userId = parseInt(req.params.id);
    const { firstName, lastName, age } = req.body;
    const ageInt = parseInt(age);
    if (firstName && lastName && ageInt) {
      store
        .updateUser(userId, {
          firstName: firstName,
          lastName: lastName,
          age: ageInt
        })
        .then(result => res.status(200).send(result))
        .catch(error => res.status(404).send({ error: error.message }));
    } else {
      res.status(400).send({
        error: "The payload is wrong!"
      });
    }
  });

app.post(
  "/api/v1/users",
  (req, res, next) => {
    const { firstName, lastName, age } = req.body;
    let ageInt = parseInt(age);
    if (firstName && lastName && ageInt) {
      next();
    } else {
      res.status(400).send({
        error: "The payload is wrong!"
      });
    }
  },
  (req, res) => {
    store
      .createUser(req.body.firstName, req.body.lastName, req.body.age)
      .then(createdUser => res.status(201).send(createdUser))
      .catch(error =>
        res.status(500).send({ error: "Unable to insert the user" })
      );
  }
);

app.get("/api/v1/users", (req, res, next) => {
  store.getAllUsers().then(users => res.status(200).send(users));
});

app.listen(PORT, () => {
  console.log("Server has started");
});
Conclusion
In this tutorial, we covered how to use MySQL in Node.js. We created a simple Node application that exposes endpoints for CRUD operations and persists the data to a MySQL database. As always, the fully functional demo is available on GitHub.
Inline/featured images credits
- Docker Logo Horizontal Blue on Docker
- Javascript image by Alltechbuzz on Pixabay


