 by
by 
Release-it is an awesome Node plugin which takes care of releasing and versioning of projects. It also supports releasing on GitHub and GitLab and certainly can tag and push to git. In this article, I briefly touch down on how to use Node.js release-it plugin with Travis CI.
The end goal
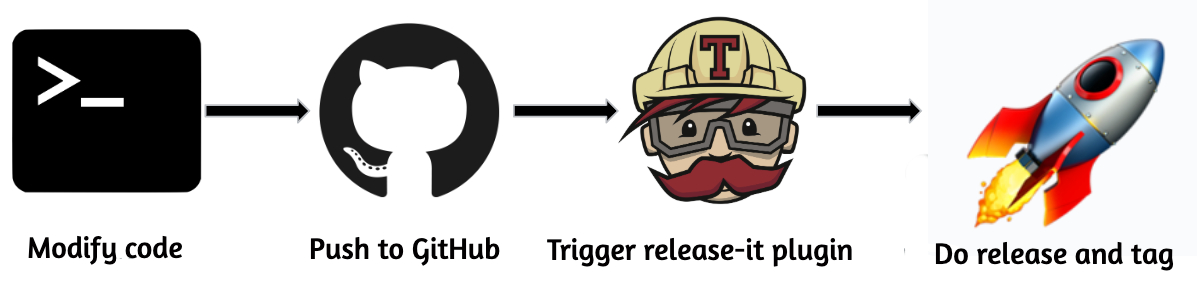
Our objective is to set a CI pipeline with Travis CI for any Node.js project. This means we want to automate the process of tagging, versioning and performing releases on GitHub whenever we push anything to the master branch. To understand the process better, have a look at the below diagram,
The process is very straightforward but getting it to work is not as easy as it sounds. That’s mainly because of some weird configuration which I discuss in the following sections.
Now let’s get started.
Installing release-it
The easiest way to install release-it plugin is to use npm as follows,
$ npm install release-it
If you don’t have npm, and you are looking for an alternative approach, have a look at the release-it documentation, here.
Configuring the release-it plugin
The most important part is to configure the plugin. The release-it plugin is very flexible and we literally can do anything with it. For our use case, all we want is to release the app and create a tag on GitHub.
For that, we need to create a file in the root directory of the project called .release-it.json. Then we need to add some content inside of it.
For our purpose, we need to configure four sections, hook, git, github, and npm.
The hook section is to instruct release-it which commands to run. It supports multiple hooks, the ones that are important for us are: before:init, after-bump, and after-release.
before-initactivates before to any release-it process. It’s the best place to runlinting.after-bumpis triggered once the release-it increases the version of the project in XXXX file. We use this step to build the project.after-releaseis when everything includes tagging and commit is done. We use this for prompting a message that release was successful.
Then we have to configure the git section and set some settings such as changelog message, requireCleanWorkingDir and so on. All arguments are pretty self-explanatory.
We also need to change npm section since we don’t want to upload any artifacts to npm. The main argument here is set publish flag to false.
And lastly, we need to apply some GitHub specific configuration. These are mainly related to the release and tag process.
So the final workable version of .release-it.json file should look like this:
Travis CI configuration
Now we need to move to the next main thing which is configuring our CI pipeline using Travis. That’s pretty straightforward, all we need to do is to create .travis.yml file and do some configuration to install node.js, configure Git and run the release-it plugin as follows:
Keep in mind that Git configuration is pretty tricky due to the way that Travis clones the repository. Essentially, Travis does a shallow clone without any upstream. So we have to add the upstream manually. That’s why in the configuration of release-it we had to set requireUpstream to false.
Another important part is to add a condition to avoid Travis CI running all the time. That happens because release-it plugin pushes a commit to Git which bumps up the project version. This can be easily achieved by comparing the commit message and if it matches a pattern Travis should not run the release process.
And lastly, we need to generate a Git token, see here on how to generate it and set it as an environment variable, GITHUB_TOKEN, in Travis setting. So that release-it plugin can use it to push a tag and commit to GitHub.
Once everything is done, just we need to trigger the pipeline and see the result.
I have configured the release-it plugin in my Metis Google Chrome weather extension. If you are curious to know about it check the following GitHub link:
https://github.com/kasramp/weather-extension


