 by
by 
Raspberry Pis are fantastic little SBCs. You can do almost anything with them. Making a supercomputer, a magic mirror, or even mine crypto currencies. In a nutshell, anything that a computer or a laptop can do, a Raspberry Pi is capable of doing it, if not more. Running a Samba server is one of them. In this article, we go through how to turn a Raspberry Pi into a Samba server that would serve terabytes of data from external hard drives reasonably. The aim is to run a Samba which satisfies the needs of home users such as streaming full HD videos with low-cost equipment.
The Raspberry Pi Samba server project scope
This project is about building a Samba server for home users in the simplest form possible.
We cover step by step how to install packages and configure a secure server that can connect to any home router via the Ethernet cable.
What we don’t cover are more complex topics such as RAID, caching, etc.
Raspberry Pi limitations
Before proceeding further it’s important to point out limitations of Raspberry Pis that affect the performance of this project.
Raspberry Pis are designed to consume low energy, yet be able to provide sufficient computing power. Given Pis’ fair price, equipped IO peripherals (especially WiFi and Ethernet) are not the market topnotch. Therefore, expecting to get enterprise-level performance from Raspberry Pis is very unrealistic.
For this project, the main bottlenecks are Raspberry Pi’s low power output on USB ports, the Ethernet port speed, and the CPU clock speed (for encrypted Samba traffic, especially on write). The limitations are sorted based on the severity.
The first problem is easily solvable, it’s covered under the equipment section.
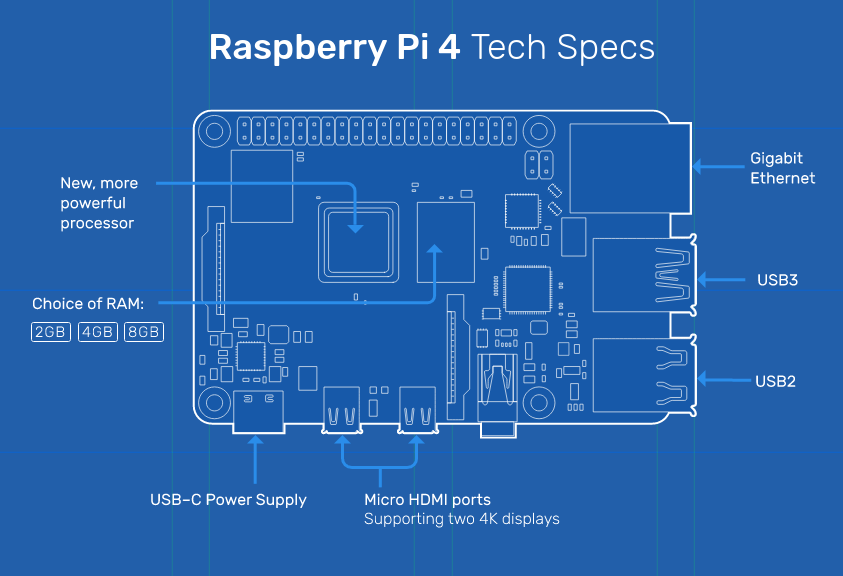
The other two are somewhat solvable by using an external Ethernet dongle and overclocking the CPU. But they are not worth it, considering ramifications on the stability. The easiest option is to use a Raspberry Pi 4 that has a gigabit Ethernet port and a 1.5 GHz Quadcore processor.
Though, that’s not a hard requirement at all. If you are happy with slower speed (~100 Mbps), feel free to use any older Pi for this project.
Samba server hardware equipment
Raspberry Pi
First and foremost, you need a Raspberry Pi, it’s ironic. The recommendation is to go with a Raspberry Pi 4, but any version works (just the performance would be slower).
Heatsinks and a cooling fan
To have a stable Samba server, it’s necessary to get the Pi temperature under the control, especially if you plan to have above-average usage. For that, install heatsinks on critical components such as the processor, the RAM, and even the Ethernet chip.
To further lower the temperature and hence the longevity of your Pi, add a cooling fan. A simple case with a small fan on top should be sufficient. Nothing fancy such as water cooling or a big fan is needed. Just make sure the fan is decent and quiet.
An active USB hub
As stated in the introduction, the goal of this project is to serve terabytes of data from multiple external hard drives. As external hard drives are mainly mechanical, a Pi is unable of supplying enough power if you connect a few at the same time. Hence, we need an active USB hub. If you are unfamiliar with active USB hubs and not sure about their differences between passive ones, have a look at this article.

Many models of active hubs are out there. I highly suggest sticking with well-known brands. My favorite one is the TP-Link UH700 – USB 3.0 7-Port Hub. It has seven ports, two of which have 1.5 A output suitable for powering Raspberry Pi without a need for a separate adapter.
A high-quality power supply (Optional)
If you purchase a quality active USB hub like the TP-Link that has high amperage output ports, you don’t need a power supply, highly recommended. Otherwise, you may need a separate power supply to power up your Pi. Just make sure to buy a genuine one, as generic ones are pretty unstable and may even damage your device. My recommended power supply is the official Raspberry Pi adapter.
My experience with a cheap power supply
I have an unpleasant experience with cheap low-quality power supplies available on Amazon. I got hold of one and ran my Pi from it for a few days. What I experienced was in less than 24 hours of constantly running the Pi, both Ethernet and WiFi became unresponsive to the level that I had to hard reset (switch on and off) the device. It also impacted the throughput of the Pi under high loads. After much research on the internet, it turns out that the culprit was the power supply. Switching to a good one resolved the issues.
External hard drives
You can grab any number of external hard drives from any vendor as long as your USB hub has free ports 🙂
Samba server installation
The assumption here is that you are using the Raspberry Pi OS, the official Raspberry Pi Linux. If not, you may need to adjust commands or package names depend on the flavor of Linux you are using.
To install Samba, run the following command,
$ sudo apt install sambaSamba server setup
Now we have to configure the Samba server. That includes adding shares, mounting shares on start-up, and securing the network.
Global configurations
Let’s begin with some global configurations such as server name, workgroup, etc.
For that open the following file,
$ sudo vim /etc/samba/smb.confIf the file has content, replace it with the below,
# samba wide configuration
[global]

# name of the server
netbios name = Raspberry Pi

# samba server description
server string = Raspberry Pi Samba

# workgroup name
workgroup = SMB

# security level (user based authentication)
security = user

# disable guest access
restrict anonymous = 2

# allow all IPs in the subnet starting with 192.168.0
hosts allow = 192.168.0.

# interfaces that Samba will use for browsing (only allow local and trusted network)
interfaces = 127.0.0.1/8 192.168.0.0/24

# limit serving requests to specified interfaces above
bind interfaces only = yes

# broadcast address that Samba announces itself
remote announce = 192.168.0.255

# broadcast address for syncing browse lists
remote browse sync = 192.168.0.255

# log file location
log file = /var/log/samba/samba.log

# log file size
max log size = 1000

# disallow clients with null password
null passwords = no

# helps Samba to try and 'guess' at the real UNIX username
username level = 6

# encrypt the password, don't store in plaintext
encrypt passwords = yes

# synchronize the UNIX password with the SMB password when the encrypted SMB password in the smbpasswd file is changed
unix password sync = yes

# support case sensitive depends on OS. Windows doesn't, *nix does
case sensitive = auto

# default casing for new filenames
default case = lower

# save the case for new files
preserve case = yes

# keep short filenames in lowercase while long filenames as is
short preserve case = yes
I commented on what each configuration does. That’s the minimum configuration. You can add more to it according to your needs. For the complete list have a look at the Samba reference.
Don’t forget to change the values of hosts allow, interfaces, remote announce, and remote browse sync to match your network settings.
Feel free to change netbios name, server string, and workgroup variables.
After that, we need to restart the Samba daemon so that the configuration can take place.
$ sudo service smbd restartSecuring the connection
In the above configuration, we already tightened access to Samba by blocking the guest user and limiting which subnet can discover and has access to the server. Now we have to add a system user to the Samba database. For that run,
$ sudo smbpasswd -a username # e.g., -a kixzIt prompts for a password. You can set the same password as the system user.
Keep note of the username as you need it when adding shares to the Samba config.
Adding Samba Shares
We continue with adding some Samba shares. Shares are resources, directories in our case, that Samba shares over a network to which any computer connected can access if it’s authenticated and has sufficient privileges.
Create mount directories
Connect your external hard drives to your USB hub and let them mount.
Then for each hard drive create a directory under /media path. To do that run,
$ sudo mkdir /mnt/[name] # e.g., /media/ex_hdd_1After that make your Raspberry Pi user as the directory owner,
$ sudo chown -R user:group /media/[name] # e.g., kixz:kixz /media/ex_hdd_1Do the same for other directories as well.
Important note: don’t use the default pi user that’s shipped with the Raspberry Pi OS. Create your user. If you don’t know, read the create users on Raspberry Pi OS article.
Add shares to the Samba config
Let’s add those directories into the Samba config. So they would be shareable over the network.
Open the smb.conf file and navigate to the bottom of the file. Then add the following config,
# share configurations

# share name that appears on the network
[External_hard_1]

# path of the share
path = /media/ex_hdd_1

# comment about the path
comment = No comment

# list of users that should be allowed to log in to use the share
valid users = kixz

# list of users that have read/write permission
write list = kixz

# users with admin privileges
admin users = kixz

# specifies whether a share is read-only
read only = no

# whether the share is available
available = yes

# whether the share is listable
browseable = yes

# whether the share is writable
writable = no

# don't allow guest
guest ok = no

# don't make the share public
public = no

# don't apply locking
locking = no

# don't apply strict locking
strict locking = no
Keep in mind to replace External_hard_1 with your preferred name and update /media/ex_hdd_1 to match with the path you created. Additionally, replace values of valid users, write list, and admin users with the Samba user that you added from the previous section.
Duplicate the above config for each hard drive and update the name and the path.
Finally, reload the daemon again,
$ sudo service smbd restartTesting (Linux)
There’s a saying that goes,
Test fast, fail fast
So let see whether a client, a Linux machine, in this case, can connect to the server.
We need to use a tool called smbclient. You can install it on a Debian-based distro using apt.
$ sudo apt install smbclientThe next step is to get a list of shares from the server,
$ smbclient -L //'[samba server name]' -W [workgroup] -U [samba username]Example,
$ smbclient -L //'Raspberry PI' -W SMB -U kixzThe above command asks for the password of the Samba user and outputs something like below,
Anonymous login successful

    Sharename       Type      Comment
    ---------       ----      -------
    External_hard_1 Disk      No comment
    External_hard_2 Disk      No comment
    External_hard_3 Disk      No comment
    IPC$            IPC       IPC Service (Raspberry PI Samba)
Reconnecting with SMB1 for workgroup listing.
Now let’s try to connect to one of the shares,
$ smbclient //'[samba server name]'/'[share name]' -W [workgroup] -U [samba username]Example,
$ smbclient //'Raspberry PI'/'External_hard_1' -W SMB -U kixzThen you should be able to see the Samba client prompt that is similar to the FTP command.
smb: \>You can type help to get a list of available commands. One of the handy commands is ls. Upon issuing it, files and directories of the share would be listed. Don’t worry about the directory is being empty for now. We solve that in the next step.
To quit, just type exit.
Mount shares on start-up on Raspberry Pi
Now that the test was successful, we should solve the empty directories problem. Those empty directories we created in the previous step would be used as mounting points for the external hard drives. The reason we don’t rely on automount functionality is that we want to mount all external hard drives upon Raspberry Pi start-up and have them accessible over the network.
Make sure your external hard drives are connected to the USB hub and run the following command,
$ sudo fdisk -lYou should see something like this,
Device     Boot     Start       End   Sectors   Size Id Type
/dev/sda2         1187840 214846661 213658822 101,9G  7 HPFS/NTFS/exFAT
/dev/sda3       214847486 937701375 722853890 344,7G  5 Extended
/dev/sda5       214847488 937701375 722853888 344,7G 83 Linux
Take note of the Device column. Write down all the external drive devices. In this example, we assume /dev/sda2 is the external hard drive. If drives are mounted automatically (which happens mostly), unmount them one by one.
$ sudo umount [device] # e.g., /dev/sda2 Now we have to get partition ids of those devices. For that run,
$ sudo lsblk -fTake note of UUIDs.
The next step is to modify the fstab file and point those UUIDs to the directories.
UUID=[device UUID]    /media/ex_hdd_1 ntfs-3g defaults    0   2
UUID=[device UUID]    /media/ex_hdd_2 ext4    defaults,noatime    0   2
The above examples are for ntfs and ext4 file systems. If you use other types, change them to your needs.
The last step is to test the configuration.
$ sudo mount -aIf you don’t get any messages means everything is fine.
Client configuration (Linux)
We want every time a client machine starts up to be connected to Samba automatically. That makes the content access experience seamless as if they are hosted locally.
At the same time we don’t want to slow down or hamper the boot time if the server is inaccessible. For that, the best approach is to lazy mount the shares and mount them really when a user tries to access them for the first time. That is how modern Linux mounts any USB stick or external hard drive.
Make sure the client machine has the cifs-utils package installed. On Debian-based distributions you can install as below,
$ sudo apt-get install cifs-utilsSimilar to the Samba server, we have to modify the fstab file as follows:
//raspberrypi.local/ex_hdd_1    /media/ex_hdd_1 cifs    credentials=/home/[client machine user]/.smb_creds,uid=[client machine user],iocharset=utf8,_netdev,x-systemd.automount 0   0

//raspberrypi.local/ex_hdd_2    /media/ex_hdd_2 cifs    credentials=/home/[client machine user]/.smb_creds,uid=[client machine user],iocharset=utf8,_netdev,x-systemd.automount 0   0
To avoid exposing the Samba user’s credentials, we stored it in the /home/[user]/.smb_creds file and only referenced it from the fstab. That is a safer and a more scalable practice.
The content of the .smb_creds should looks like this,
username=[samba user]
password=[samba password]
domain=[workgroup]
Make sure to set 0600 permission so that others can’t access it.
Lastly, to test whether mounting is working or not run,
$ sudo mount -aIf you open up your file manager, you should see the drives under the network tab.

Configure Samba with a GUI program
If you are uncomfortable editing text files when configuring your Samba server, you can use the GAdmin-SAMBA program instead.
To install just run,
$ sudo apt install gadmin-sambaOnce you open the program, as the root, of course, you can enjoy some default configurations and add shares via the interface.

Dealing with slow writes
Since the Samba connection is secured, you may face a slow writing issue. Unfortunately, that’s one of the main drawbacks of running a Samba server on a Raspberry Pi. The simplest fix is to use sshfs for writing. You can find out more about it here. Maybe in the future, I write an article about it too.
Summary
In this post, we extensively covered how to set up a Samba server on a Raspberry Pi from scratch that’s secure and suitable for home users. The process is pretty straightforward, quick, and doesn’t cost much. Additionally, the gadmin-samba program makes configuring Samba very beginner-friendly.
The only known issue of running a Samba server on a Raspberry Pi is the slow write (only if the Samba connection is encrypted).
Inline/featured images credits
- Raspberry Pi specs image by Raspberry Pi
- TP-link hub image by TP-link
- Featured image by Jainath Ponnala on Unsplash


